Tuesday, July 7, 2009

A Proper Goodbye

The end of year was nutty as per usual and I realize that I have not wrapped up Tetra Blink properly. So, this is it, the school year is done and so, therefore is this blog. If you are interested the 8th grade students going into 9th grade in September have a summer assignment which you can follow on Summer Art Jam. It is an assignment based on the idea of creating 12 pieces of art centered around one object, come on over and have a look.

Thank you for a great year!

Just to wrap things up with a smile, here are some Sock Monkey pictures:

click on the picture to see the album on fb


And for those of you who are interested in making Sock MONSTERS, visit these links:

Jack by Nicky Gibson

Friday, June 12, 2009

Smart History


An excellent resource for Western art. Easy to use, fun and engaging it makes a great change from the traditional art history book.

Announcements Week 38 (15-19 June, 2009)

Exams are over! This is it, the last week of school before Summer Break. Enjoy these last few days and drop by the Art Room to collect any of your stuff that might be there.

Grade 6
I am still taking Sock Monkey portraits. When they are posted on Facebook, you should go and tag your monkey as well as write his/her name underneath their picture. They are all fabulous!

Grade 7
If you have not picked up your Flipbook 2, come and get it.

Grade 8
Some of you still need to come and pick up your folders and Development Sketchbooks. If you have not taken them by the end of the week, they will be "recycled".

Tuesday, June 9, 2009

Flipbook 4


by Çiğem Kökenöz

Monday, June 8, 2009

The Brainstormer


Don't know what to draw? Have no ideas? Then check this out! This is a fantastic online application designed by Andrew Bosley to generate unusual sketching topics by combining random words. Click on the image and start spinning the dials. You will never be stuck for an idea again.

Saturday, June 6, 2009

Announcements Week 37 (08-14 June, 2009)

It is exam week, all regular classes are done for this school year. We will still be seeing each other for afternoon study hall etc. I will be posting some Sock Monkey updates as well as Sock Monster information for those of you who have asked for it!

Grade 6
The Sock Monkeys are beautiful - make sure a photo is taken of your monkey by the end of next week. If you are still sewing, the Art Room is open during first break and lunch - there are always kids here sewing, so come!

Grade 7
The second Flipbook challenge is done. Come and pick up your Flipbook 2 from me this week along with your grade for this final challenge. They look good!

Grade 8 IGCSE candidates going into Grade 9, we have a meeting on Wednesday, June 10 at 12:45 to go over your summer assignment and for me to answer any last minute questions you might have. The IGCSE Summer Blog is up and running - bookmark it, it is is your reference for the 12 Variations assignment. You should also bookmark Ms. Krugman's blog which you will be using in high school next year.

All Middle Schoolers

Please remember to come and pick up your Development Sketchbooks as well any other art that is still here in the art room.

Friday, June 5, 2009

Sock Monkey 2


As always the Sock Monkey's take on a life of their own. They start out as an idea, something that you thought about and drew in your Devlopment Sketchbooks, then they become a thing that eventually has all its parts and need to be sewn together AND THEN they become REAL.

You spend all your spare time in the Art Room learning how to connect all the pieces, teaching and helping each other and the next thing I know, you are introducing me to Flanders, Homer, Bella or whomever it is your Sock Monkey has become. You talk about them as if they are people and all I hear about and see for days on end are Sock Monkeys populating our world as if an invasion has occurred. They are incredible.

Saturday, May 30, 2009

Announcements Week 36 (01-05 June, 2009)

All Middle Schoolers are invited to enter into the Global Community Project, In Peace Together, if you are interested read the link that I posted and then come and see me if you have any further questions.

Grade 6

This is the week that the Sock Monkeys really come together. Most of you will finish them this week. You have torsos, tails, arms, and ears ready. Some of you have even made hearts. Get ready to do some serious sewing this week.

Grade 7
I posted two examples of the sticky-note flipbooks, scroll down and take a look. Everybody is now working on their larger, loose-leaf format with nice heavy weight paper, which will be bound using a bull-clip. These are all due this coming Friday, June 5th - our last art lesson together!

Grade 8
One class left. Last week you were challenged to make a sticky-note flipbook like the 7's had been making. I posted two examples of student work just below - take a look. One challenge left, for our last lesson together. See you bright and early on Monday morning!

Thursday, May 28, 2009

Flipbook 3

Yo-Yo by Çiğdem Kökenöz

Flipbook 2


The sticky-note flipbook challenges have been fabulous. Watch The Balloon by Deniz Özişik in Grade 8.

Abstract 2

Abstract by Ela Altay

The Abstract Watercolours that you painted a few weeks ago are now uploaded and ready for everybody to look at. Click on Ela's picture to view the rest of the paintings. These turned out to be extremely successful. Congratulations!

Wednesday, May 27, 2009

Ephesus Blog Completed


The Ephesus Blog is complete. Everybody has been published. You should take a look and share this with your family and friends. It looks amazing.

Sunday, May 24, 2009

Announcements Week 35 (25-31 May, 2009)

All Middle Schoolers are invited to enter into the Global Community Project, In Peace Together, if you are interested read the link that I posted and then come and see me if you have any further questions.

Grade 6

Many of you completed your torsos last week and have started on tails. The sewing is looking fabulous and I am excited to see the monkeys begin to take shape.

Grade 7
You completed your first flipbook using a sticky-note pad. Those of you who did not hand them during class on Friday are expected to deliver them during the first ten minutes of your first lesson with me this week. This week you will begin working on your second flipbook, which will be completed on larger cut paper and bound with a bull clip. Remember that I am expecting to see a story, and that your flipbook will need to be at least 30 "frames" (pages) long.

Grade 8
Two classes left. You will complete two more in studio challenges before the end of this school year. Come ready to strain your brain!

Thursday, May 21, 2009

Flipbook 1


Cut out Flipbook - The most popular videos are a click away


Your next assignment is to create a Flipbook. I have asked you to think about what you might draw. The best thing to do is to choose an object that you want to see move, that you also know you can draw with relative ease. Then you should write a short description of what you want to see happen in your book.


For example, I might want to draw:
A dragon setting light to a pile of sticks while sitting in front of her cave


Things that I might then think of are:
  • Exactly what my dragon looks like and can I draw her again and again? And then...
  • She is sitting, while she is trying to light the fire
  • I imagine in my head that I will have to draw her lowering her head towards the sticks, puffing up her cheeks, and blowing through pursed lips
  • She might try several times and then a small flame will appear
  • The flame will not quite reach the sticks at first
  • Her head will pull back before she leans down to try again
  • Suddenly the sticks catch fire
  • The dragon will lean back and sits contentedly watching her fire burn
Or you could choose something much more simple, but just as enjoyable.

In class you will be creating two Flipbooks; one using a sticky note pad and another using art papers.

In Peace Together


THIS GLOBAL COMMUNITY PROJECT LOOKS TO THE CHILDREN OF THE WORLD TO JOIN TOGETHER IN THE EXPRESSION OF WORLD PEACE

We invite children the world over to participate in the creation of an enormous global peace puzzle.


To all Middle School Students,

You are invited to create a picture that represents your idea of PEACE. Your picture should be 30 x 30 cm in size and submitted to me, Ms. Lacoste, no later than Friday, June 5, 2009

"This celebration of peace is designed to allow children a means of contributing to a brighter future.

We are asking children around the globe to paint a picture of peace. We will then mount these pictures onto puzzle pieces here in Canada and assemble an enormous, global peace puzzle. So far the response by the children has been incredible. We are inviting your students to take part in this inspiring project. Please visit www.inpeacetogether.com for details on how to participate."


See me if you are interested in participating. I will explain the details to you and help you get your artwork submitted on time.

Ms. Lacoste


Sunday, May 17, 2009

Announcements Week 34 (18-24 May, 2009)

Grade 6
You have started actually sewing your Sock Monkeys! After what seemed like forever, learning how to back stitch, everybody got off to a great start on their Sock #1 - the torso and legs. Looking good, nice sewing everybody. This week we continue...

Grade 7
The Haiku Prints challenged you to make a leap from judging process and not product. The printing was an imperfect scenario due to challenges with the materials, but the most important thing was for you to complete 3 prints in the given time and to understand the process - not for them to be the most amazing art that you have ever made, which, let's face it, they weren't! Good work on the timed challenge.

Grade 8
The Abstract water colours based on a photograph of your from Ephesus were hugely successful. We will be assessing them this week and then moving onto our last few lessons together this year. Time is flying.

Sunday, May 10, 2009

Announcements Week 33 (11-17 May, 2009)

Grade 6
Last week you learned how to back stitch as well as completed a full description of who you imagine your Sock Monkey will be when s/he is completed. This week we get down to the real challenge of sewing.

Grade 7
Your Haiku print is designed and this week you will complete a series of prints.

Grade 8
I am finishing the Efes Blog this week, if you have not submitted your pictures then you will need to make an appointment to see both Ms. Helmer and I.

This week for the Abstract project you will be:

  1. Handing in your 3 sketches as well as sketch paintings
  2. Completing a presentation quality final
  3. Handing everything in with your completed rubric
  4. Taking your Art Work down from the walls and taking it home with you

Thursday, May 7, 2009

Haiku 3 - The Print

The final piece in your Haiku trilogy is a print. You will be creating a simple print based on a line drawing that represents your haiku. In class you will be using simple Styrofoam plates to create your prints.

Picture 1 - The Sketch

The first step is to draw your image. Something to keep in mind when drawing: Each line will become "negative" space in your print. What you see as dark in your drawing will become white in your print.


Picture 2 - The Plate

The second step is to transfer your drawing onto your printing plate. Remember this: If you want your image to print in the same orientation (view) as you drew it, you will need to transfer your sketch onto the printing plate in reverse. Compare picture 1 and picture 2 (picture 2 is in reverse).


Picture 3 - The Print

The third step is to print. You will be using a acrylic paints and fine art paper for your actual prints.

Materials needed:
  • Pencil
  • Paper (for sketch)
  • Styrofoam Plate
  • Pens, Nails other like objects (to etch with)
  • Art Paper (to print on)
  • Acrylic Paint (print medium)
  • Acetate (print palette)
  • Paint Roller

Monday, May 4, 2009

Sock Monkey 1

Gusteau Bakiler

We are really starting our Sock Monkeys this week. You will need to have 1 pair (2 socks), a needle and some thread in order to make your monkeys. The first thing that you are going to do is lean how to sew, so come prepared to do some stitching in your Development Sketchbooks.

In Your Development Sketchbook
You should have written an exploration of who your Monkey is going to be and how you think it is possible to create a Monkey from two socks. I asked you to think about the following things:
  1. What kind of character do you think your Sock Monkey will be?
  2. How do you know what kind of personality traits s/he will have?
  3. Do you think that the colour and pattern of your sock helps determine who your Sock Monkey will be?
  4. Draw a diagram of how you think the socks will become the various parts of your Monkey
  5. Once you have understood how all the parts of the Sock will become a Monkey you will draw an accurate Monkey based on your actual Socks

Nuts Arapgirlioğlu

Sunday, May 3, 2009

Announcements Week 32 (04 - 10 May, 2009)

This will be our first uninterrupted week in a while, so hopefully things will move along smoothly...

Grade 6

If you have not already, bring socks and a needle.

Grade 7
The Haiku print is the last in your series of Haiku illustrations, you will design and complete a series of prints this week.

Grade 8
As you have now all seen in class the Efes Blog is looking great. Make sure that you get your pictures to me this week if you have not done so, that way we can talk seriously about publishing a book.

This week you be:

  1. Finalizing your Abstract of your photo
  2. Painting it as a watercolour that is presentation quality
  3. Completing the rubric and handing it in with your final work

Tuesday, April 28, 2009

Abstract 1

Piet Mondrian, Still Life with Ginger Pot, 1911

Your next assignment (running for two consecutive weeks) will be to take an image through a series of stages from realistic, to stylized, or more organic to geometric. The image that you will be working with is one of the photographs that you took on the Ephesus trip.

The end product must convey a sense of visual balance with an area of emphasis (focal point). Emphasis can be achieved by effectively using colour, shape and line. To assist you in defining emphasis you will limit your palette to 3 colours. If you use a tint or a shade that counts as one of the colours.

You will complete three paintings:
  1. Realistic
  2. Less Realistic/Towards Abstract (figuring out the essential lines that you want to work with)
  3. Geometric/Abstract (choosing main shapes and lines to represent your image)

Piet Mondrian, Still Life with Ginger Pot, 1912

You will need:
  • Picture from Ephesus printed on A4 paper in colour
  • Development Sketchbook
  • Watercolour Paints

As background information and some inspiration we will be looking at Piet Mondrian's work.

Sunday, April 26, 2009

Announcements Week 31 (27 Apr - 03 May, 2009)

Tuesday the Student-Led Conferences are happening make sure that you have your Dev Skbks for your Portfolios. There will be no access to the Art Room during the day on Tuesday.

Check out the Efes Blog that is developing. It has photographs with captions that the 8th Grade took as well as pictures they did not take...

Grade 6

Bring Socks...CLEAN socks :)

Grade 7
You will start designing your Haiku Prints this week.

Grade 8
The Efes Blog is looking beautiful so go and make sure that you check it out. We will be talking about printing a book in class...

This week you need to:

  1. Bring a photo to class from the Ephesus trip, one that you took
  2. Print it on regular bond paper at A4 size in colour.
You will be learning about how to abstract a picture à la Mondrian, more about that when I see you.

Sunday, April 19, 2009

Announcements Week 30 (20-26 Apr. 2009)

Grade 6
Your Concrete Poems are looking amazing - this week you will be adding the finishing touches and putting them all up on display in time for the Student-Led Conferences.

Grade 7
Our week is being cut short, some of you will be revisiting the watercolours for your Haigas - you know who you are! :)
And some of you will be helping me with the Children's Day Celebration decorations

Grade 8
This week I am grading your Efes Albums on Facebook - If you have not created one yet and messaged me to go and get it off of your profile, you need to do that: YOUR GRADE IS DEPENDENT ON IT. Thanks guys...

Thursday, April 16, 2009

Haiku 2 - The Haiga


Continuing your exploration into how to illustrate your haiku poems that you wrote in English class, we are going to look at the idea of Haiga. You have just completed an "edit" series of your haiku which entailed creating three illustrations, one for each line of the poem, much like a comic strip. Now you are going to be challenged to consolidate your imagery into one evocative picture to represent the entire poem, first in the form of a Haiga and then later in the form of a print.

The characteristics of a haiga are: ink-brush or watercolor painting, a poem and calligraphy, usually all combined in an image that appears to be quite spontaneous and free flowing.

Tuesday, April 14, 2009

Photography 2


Now that you are back from Ephesus with mounds and mounds of images to sort through, your next assignment for Art is to choose three (3) of those images and create an album on Facebook where you will upload and store the pictures.

Here are the instructions:

  1. Look through all of your photographs
  2. Choose: a landscape, a portrait and a detail
  3. Rename the photo files using this format: yourname_portrait.jpg. Usually your image will be called something like: DSCF6616.JPG. You will need to click on the file until it is highlighted and then type in a new name, for example: lacoste_portrait.jpg. It is important that the file extention JPG is at the end
  4. Check your file names. You should have 3 images that are labelled like this: yourname_landscape.jpg, yourname_portrait.jpg & yourname_detail.jpg
  5. Create a new photo album in Facebook
  6. Label the album: Your Name Efes Photos (example: Lacoste Efes Photos)
  7. Upload the 3 pictures
  8. Save
When your Efes Facebook album is created we will use it for English and Art class. This is going to facilitate our ability to put together the Ephesus Book as well as use it for the Visual Blog that we are also going to make. Good luck! Come and see me or Ms. Helmer if you have any questions.

Sunday, April 12, 2009

Announcements Week 29 (13-19 Apr. 2009)

Grade 6
You have started your Concrete Poems with your Project Planning Guide - this week you will all book appointments with me to talk about your ideas/concepts for your poems.

Grade 7
Your Basho Haiku illustrations were quite wonderful and so this week
you will start working on your own poems.

Grade 8
Back from Ephesus, we will be talking about how to develop and plan for your book.

Haiku 1

our bowed heads reflect
on spirals; brittle bodies,
floating question marks

Simon Clarke on Flickr

As a collaboration with Mr. Kattsir's English class the Grade 7 is exploring how to illustrate Haiku poems. Things we talked about this week in class were:

A haiku is a form of poetry that is usually about nature and emotion, it originated in Japan, it can be somewhat open-ended and it does not need to rhyme. I told you the story about Sergei Eisenstein (Russian filmmaker) who was inspired by the haiku to develop montage (editing) in film. Based on this idea I gave you the following poem by Matsuo Basho (1644-1694):

An old pond!
A frog jumps in -
The sound of water

I then asked you to draw 3 frames in your Development Sketchbooks and to create an illustration for each line of the haiku. Almost like a comic strip, you illustrated the poem and told the story without words. Your drawings had to be black-line only, no shading, no colouring, just varieties of line. The second haiku that you drew was also by Basho:

In all the rains of May
There is one thing nor hidden -
The bridge at Seta Bay

Concrete Poetry 1


The Good, The Bad, The 6th Grade
A compilation of original poems that will be displayed around the Middle School...

Inspired by Technically It's Not My Fault by John Grandits

This past week we completed two lessons around the idea of Poetry, specifically the poems that you wrote for Ms. Kemp in English class. Here is the basic idea: You have each written a series of poems. Based on the idea of a Concrete Poem, in art class you are going to develop a way to present your poem on the object that it is written about. For example: if you wrote about the toilet...well, somehow you are going to use the bathroom to present your poem. Or if you wrote about a door, you are going to wrap/cover the door so that you can write your poem all over it.

In class we talked about Concrete Poetry and gave it some definitions of our own:

  • It is a kind of poem that does not need rhyme
  • It takes the shape of what it is
  • It tells a story
  • It can be about anything
To plan and figure out how to present your Concrete Poem you are going to be working independently in a Studio style, following the Stages listed below. You will also be booking an appointment with me so that I can help you develop your idea and give you some tips about how to go about it.

Stage 1: Project Description
(Development Sketchbook)
  1. What type of Poem are you dealing with?
  2. What is the title of your Poem (this will also become the title of your Project Description)
  3. Write the Poem
  4. Write and description for your intended Art Piece
  5. Create a Dimension Chart - measure the size of the actual object you will be using and then scale the objects dimensions for your Scale Model
  6. Materials List
Stage 2: Illustration (Draw in your Development Sketchbook)

Stage 3: Scale Model (Make in Class)

Stage 4: Final Piece (Make in Class)

Tuesday, April 7, 2009

Announcements Week 28 (06-12 April, 2009)

Sorry that I am late posting this - Last night was the Art Show and as you know, we have been busy getting everything ready. Thank you to all the students you mounted, tagged and tabbed all their own work over the past two weeks. The halls look amazing and I think that you should be very proud of your work.

This week in Art:

Grade 6
We are starting Concrete Poetry in collaboration with Ms. Kemp's English class I will be helping you create your displays for your poems. Come with ideas and be ready to do some creative problem solving.

Grade 7
Also together with English class (Mr. Kattsir's classes) we will be creating prints to illustrate your Haiku poems that you have written. I will be talking to you in class about Haiga.

Grade 8
The Grade 8 departed for Ephesus this morning (boy, are the halls ever going to be quiet!) and they should be thinking hard about photography.

Sunday, March 29, 2009

Photography 1

Aphrodisias adjusted using Tilt Shift Maker


The main art component that you are going to be working on while on your trip to Ephesus is photography. As a class (together with English) we are going to be working on compiling a book based on your photos from the Ephesus trip. Ms. Helmer has been talking to you about captioning photographs in order to help tell the "story" of the picture. We will talk more about that when you get back. What I am going to send you off with are some general guide lines to think about while you plan your pictures:

Improve Your Photos 60 Seconds at a Time is an excellent guide of easy tips to read and REMEMBER. You do not have to remember them all, but if you read through the list the ideas that are interesting to you are the ones that you will think about the next time that you plan an image.

Tilt-Shift Maker is a fun application that can be used when you get back from Ephesus. What are tilt-shift photos you ask? Tilt-shift miniature style photos are pictures of real-life scenes that are manipulated to look like model photographs. This can be an effective technique to employ, especially when looking at the type of architecture that you will be seeing. The fun comes with making the scale of the photo look as if you are seeing a miniature replica of the real thing. I find that it draws you in to the details of the landscape.

You can compare the two photographs in this blog, the one above is tilt-shifted and the one below is the regular photo that I took while visiting the site.


Aphrodisias without any adjustments

As I mentioned, Ms. Helmer has been talking to you about captions and how to write to support your photograph with information which does not re-state the obvious but, rather, adds to what can be seen. While you are thinking about captions you can also think about how you might describe a picture that you did not record. Unphotographable is a website by the photographer Michael David Murphy who describes it as; a catalog of exceptional mistakes. Photos never taken that weren't meant to be forgotten. Opportunities missed. Simple failures. Occasions when I wished I'd taken the picture, or not forgotten the camera, or had been brave enough to click the shutter.

There, a few things to think about while you adventure on your Grade 8 trip. Enjoy!

Announcements Week 27 (30 Mar - 05 Apr, 2009)

Welcome back from Spring Break, this week we are prepping the Art Show. Each student will be choosing 3 pieces to display in the Art Show. As a class you will be making sure those pieces are properly mounted, tagged with your name and ready to exhibit.

Grade 6
Each student will be choosing their art pieces for the show and making sure that they are ready to be displayed.

Grade 7
The Grade 7 has quite a lot to accomplish this week in order to be ready for the Art Show:

  • 701 - Finish Painting the Time Line this week
  • 702 - Mount your Line Drawings, complete the Friendship Wheel with or without the epoxy AND move Ceiling Jesus
  • 703 - Complete your Shadow Boxes
Grade 8
On top of getting prepped to exhibit your work we will also be going over some Photography tips for you to think about while you are on your trip to Ephesus next week.

Friday, March 20, 2009

Announcements Spring Break

Enjoy this week with your friends and family, eat, sleep, watch movies, maybe have an adventure and then eat and sleep some more.

Sunday, March 15, 2009

Announcements Week 26 (16-19 March, 2009)

Grade 6

Clay Tiles see posting Clay Tiles 1

Grade 7

  • 701 - Art Time Line: Art Time Line: Painting your section of the quote - Do not forget to BRING A COLOUR COPY
  • 702 - 702 - Friendship Circle: is on hold until the epoxy comes through. You are working on Line Drawings of your own inspiration - remember to look at Samantha Zaza's drawings for inspiration.
  • 703 - Cylinder Seals: Creating the Shadow Boxes for your Cylinder Seals, which were a success!
Grade 8
You are working on your 3 Self-Portraits (Collage, Ink & Line) due in THIS WEEK:

801: Monday, March 16, 2009
802: Wednesday, March 18, 2009
803: Thursday, March 19, 2009

Clay Tiles 1


Based on the ideas of line, texture and pattern - you were asked this week to make a series of tiles using quick-drying clay. The tiles were rolled and cut to a uniform size by you and then we went around the class and gathered up any object we could find that could be used to make an impression/pattern in the clay. You were challenged to create texture and pattern using the various objects. This week you will be painting the tiles with acrylics.

String Art 2

timur

Click on the image to see all the other pieces that were made in class. They look beautiful.

Wednesday, March 11, 2009

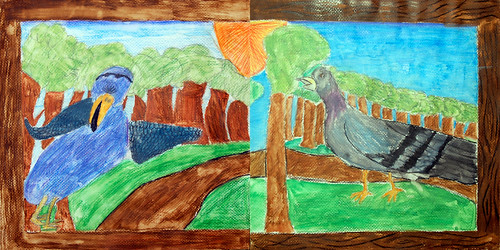
Pigeon Portraits - 703

tim_mo

To see all of the portraits click on the picture and it will take you to the flickr page.

Sunday, March 8, 2009

Coup

Coup 1 by Samantha Zaza

On Saturday morning I discovered these fabulous paintings by the artist Samantha Zaza, who lives and works in Istanbul and is an Urban Sketcher. There are 16 paintings in the series and I am posting them here especially for the Grade 703 who recently completed a series of Pigeon Portraits.

Make sure that you click on the picture so that you can go and look at all the other portraits as well as explore the rest of Samantha's work. Enjoy.

A special thank you to Ms. Zaza for generously sharing her artwork with us.

Saturday, March 7, 2009

Announcements Week 25 (09 -15 Mar. 2009)

Grade 6

The 601 - String Art, 602 - Mobiles and 603 - Silhouettes are all completed and so you will be starting a new project this week. There have been a number of lists made and handed to me with suggestions, so over the next day or so I will be deciding what we will be going next. Think clay...

Grade 7

  • 701 - Art Time Line: Art Time Line: Painting your section of the quote - Do not forget to BRING A COLOUR COPY
  • 702 - Friendship Wheel: Mounting the Portraits onto the Board, Making all the name tags, hammering the circle of nails and starting to string all the connectors. (Somebody needs to do Doğa's picture.
  • 703 - Cylinder Seals: Creating the Shadow Boxes for your Cylinder Seals, which were a success!
Grade 8
You are working on your 3 Self-Portraits (Collage, Ink & Line) due in 2 weeks:

801: Monday, March 16, 2009
802: Wednesday, March 18, 2009
803: Thursday, March 19, 2009

Friday, March 6, 2009

702 Self Portraits

Sunday, March 1, 2009

Announcements Week 24 (02-08 Mar. 2009)

Grade 6

  • 601 - String Art: Mounting your work for the Art Show.
  • 602 - Mobiles: STILL Stringing the pieces for your mobile, balancing it out and hanging it in the Art Room - who knew it would take such a long time! :)
  • 603 - Silhouettes: Writing your descriptive sentences to embellish your Silhouettes

Grade 7

  • 701 - Art Time Line: Tracing your art work and starting to paint it.
  • 702 - Friendship Wheel: Mounting the Portraits onto the Board, Making all the name tags, hammering the circle of nails and starting to string all the connectors. (Somebody needs to do Doğa's picture.
  • 703 - Cylinder Seals: Getting the FIMO onto the cylinder and Carving your design. Much patience will be needed.

Grade 8
You will be starting on your series of Self-Portraits. You have the next 3 weeks to complete a Collage, Ink and Line Portrait of yourself. Read the checklist.

Monday, February 23, 2009

Line Work

The Rhinoceros, Albrecht Dürer, 1515


The last portrait in the series of portraits (Collage and Ink) that you have been doing is the Line Portrait. It is the third variation in the portrait series and it is very much like it sounds. You will complete one last picture of the face that you have been working with using just line. Your line work will be similar to as if you were designing for a wood-cut print.

In class you will receive a paper that breaks down Albrecht Dürer's The Rhinoceros and shows the different variations of line that he used to create the overall look of his print. Some things for you to keep in mind are:
  • Your line work should be controlled, carefully spaced and drawn with deliberation
  • You can use a variety of different types of line to emphasise shape and form
  • Your line work should enhance the image, even though it is exaggerated in its deliberation it should not be so abstract as to be unbelievable
  • The line should follow the natural contours of the facial features, hair, clothing etc.
  • Using line only you will create value (areas of light and dark) in your drawing

Sunday, February 22, 2009

Announcements Week 23 (23 Feb. - 01 Mar. 2009)

Grade 6

  • 601 - String Art: Completing your designs and then mounting them for the Art Show.
  • 602 - Mobiles: Stringing the pieces for your mobile, balancing it out and hanging it in the Art Room
  • 603 - Silhouettes: Working on the descriptive sentences to embellish your Silhouettes

Grade 7

  • 701 - Art Time Line: Time periods have been assigned, images researched and final one chosen. You need to talk fonts this week and how to make a stencil.
  • 702 - Friendship Wheel: Everybody should be completing their portrait. You need to discuss the order that you are going to put all the names on the wheel and how you are going to tag them.
  • 703 - Cylinder Seals: This week you will make your seals. We have FIMO clay to work with, the carving is tricky but fun

Grade 8
You will be starting on your Line Portraits and everybody should have submitted their photograph to me via email for the Self-Portraits.

Friday, February 20, 2009

Ceiling Painting - 702


The Ceiling Painting completed by 702 which we fondly refer to as 'Ceiling Jesus' makes people gasp when the walk into the room, which is the whole point.

Space Collage - 701


Wednesday, February 18, 2009

Silhouette 1 - 603


603 you have started making Silhouette Portraits in class. The last two lessons you used the projector in class to help trace each others shadow (in this case, silhouette) onto butcher paper. After you had traced, you then cut out your own portrait and transferred it onto a piece of coloured paper, carefully cut that out and then mounted your image onto a background colour.

The next step as a class is to start coming up with autobiographical descriptive sentences that you are going to incorporate into the final picture. You are going to play around with handwriting, fun sentences and where to place them in our overall picture...

Tuesday, February 17, 2009

Art Time Line 1 - 701

(click on me to make me larger)

The idea for this project is to create an Art History time-line using a quote that runs across the various images representing different eras in art. Because there are 15 students in the 701 class there will be 15 different panels.

The quote that you all agreed upon is attributed to Alan Kay who is an American Computer Scientist:

The best way to predict the future is to invent it.

Now that you have brainstormed the basic idea for the project and I have made you a rough example of what the end product could look like, as a group, the following things need to be done:
  • Each of you will pick a time period to paint (choosing from a hat).
  • You will do some simple research on the time period
  • Choose an art piece to represent the period
  • As a class you will make a 'mock-up' of the time line with your chosen images
When you get to this point, you will start to talk about final project dimensions, sizing for each panel, font and how to stencil the quote into the art pieces as you set about reproducing them.

For a great Art History link go to SmartHistory and take a look.

Mobile 2

602 you have done a beautiful job painting your Mobile pieces and now you are ready to start finding the balancing point of all of your pieces and stringing them into a Mobile like the one below.


This is a step-by-step account of how to complete your Calder Mobile. Right now you are all ready to start Step 7.

Grade 6 Studio Work

  1. Trace your template on the backside of the paper using an oil pastel, you can use the window for this;
  2. Carefully staple your template to your cardboard;
  3. Trace your template using a ballpoint pen
  4. Cut out the six pieces of your mobile;
  5. Keep all of your pieces together using the blue construction paper that the teacher has given you;
  6. Paint the pieces with acrylic paint. You can use any colours that you like. Be sure to paint one side at a time and allow the side to dry completely before you turn it over to paint the other side;
  7. Find the centre of balance for each piece by balancing it on your finger. Lay it flat on your finger until is does not fall off, it will balance perfectly like a see-saw. Mark that point with a pencil;
  8. Make two holes in each of your mobile mobile pieces using a needle. One hole just below the top edge of the piece at the balance point and and one hole at the "tail" end of the piece;
  9. Using thread string all the pieces together;
  10. Check to see that your mobile is balanced and make any adjustments needed;
  11. Hang it up in the classroom above your work tables.

Monday, February 16, 2009

Friendship Wheel 2 - 702

What has been decided is this:

  • Each member of the class will create a self-portrait, this will mean 16 panels, which when laid out 4 x 4 will create a large square background.
  • The background will be a press-board, the portraits will be evenly spaced and glued to the press-board creating a class portrait as the main image.
  • In a large circle on the board there will be one nail for each student in the 7th grade (44 people) with their names attached on a ribbon (or other material).
  • You have collected 'data' by pooling each member of the 7th grade, asking them at least two questions each that could be answered by either a yes or no.
  • Students will be connected via a thread/threads to each other on the circle depending on their responses to the questions that you have asked.
  • Viewers will be able to see how the 7th grade is linked not only as students sharing the same year in school but also by their particular interests.

Sunday, February 15, 2009

Announcements Week 22 (16-22 Feb. 2009)

Grade 6

  • 601 - String Art: Everybody should be sewing this week.
  • 602 - Mobiles: Painting is almost done and then you will be stringing the pieces for your mobile.
  • 603 - Silhouettes: All silhouettes should be mounted and you will be working on the descriptive sentences.

Grade 7

  • 701 - Art Time Line: conceptualised, now you have to start figuring out which time periods and images to use.
  • 702 - Friendship Wheel: Everybody should be working on their portrait this week.
  • 703 - Cylinder Seals: This week you will make your seals.

Grade 8
If you have not completed your Collage Portrait from two weeks ago and your Ink Portrait from last week you need to make that a priority this week.

Sunday, February 8, 2009

Black and White


Last week all of you were set the challenge of completing a Collage Portrait during class time. The time limitations forced you to make quick decisions and to work continuously without debating your choices too much.


This week you will be taking the same image from last week and creating a black and white copy of it using only white paper and ink. The concepts are similar - shape and form will be chosen to represent features in the portrait. The big difference here is that you will be working with only black and white. Nuances will be further blurred; you are not creating a line drawing, but something closer to a "stamp". As you can see from the example, detailing is once again simplified, but the overall contours and shapes of the face, hair, eyes, mouth, nose, and chin are still evident.

Announcements Week 21 (09-15 Feb. 2009)

Grade 6

  • 601 - String Art, please bring a needle to class, we can not proceed without them!
  • 602 - You will finish cutting out your mobile pieces and start painting them this week.
  • 603 - Let's talk about simple printmaking...
Grade 7
  • 701 - The Space Collage is done and looks fabulous, I will photograph it this week and post it for you. This week you will be deciding on the details of your next project. Bring ideas for styles of art that you like, and an object we can all agree on using.
  • 702 - Friendship Circle, Collage Portraits have started. We will be looking at your data for the wheel this week. Make sure you POLL the entire 7th Grade for each of your questions.
  • 703 - Cylinder Seals - Your myth should be well researched. You have decided on which images you are going to use and are bringing pictures to class to help you draw your images.
Grade 8
Last week I set you the challenge of completing a Collage Portrait during your art period. This week you will be taking that same image and transferring it into a black and white image using only white paper and ink.

Thursday, February 5, 2009

Cylinder Seals 1

Cylinder Seal, Shamash, Louvre


703 you are going to be designing and making your own Cylinder Seals. In class today we talked about Cuneiform script and how it was a writing system originally based on pictographs. Thomas showed us how the words fire and mountain are written in Cantonese and we guessed at how the word may have been derived from its early pictogram.

Your aim for this assignment is to create an original seal that depicts part of a myth, legend or fairytale. The challenge is to create a storyline that is able to both start and end within the same image once it is printed. We made the example of how we would depict the Minotaur's story - We know that the Minotaur lived within a maze and so we chose those two ideas, the half-god that the story is about and the place the story mostly takes place. A cylinder seal based on this story could show the Minotaur entering the maze as well as leaving it using only two clear pictogram. The entrance of the maze would have to be closest to the head of the Minotaur as he is facing it, looking as if he is about to enter and the exit would be placed closer to his heels. This way as the image is rolled out it would look like the one creature both entered and left the labyrinth.


Cylinder Seal by Ahmad Nadalian


Some of the Myths and Legends that we listed were: Gilgamesh, Beowulf, the Phoenix, St. George and the Dragon, Persephone, Orpheus, Icarus, Jonah and the Whale, Creation Stories, Constellations, Kraken, Pandora's Box and Werewolves just to name a few. You need to decided upon your story, research it and come ready to start figuring out how to draw it in simple imagery. Good Luck!

Wednesday, February 4, 2009

Mobile 1

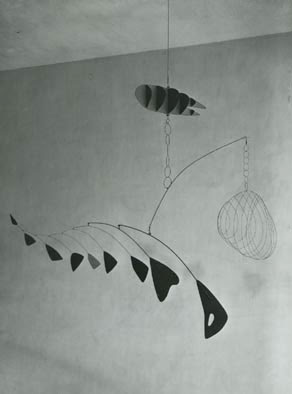
Lobster Trap and Fish Tail, 1939 Alexander Clader

As a class you are going to be exploring the world of kinetic energy and making your own Calder-like mobile. Alexander Calder (1898 - 1976) was an American sculptor and artist who is credited with inventing the mobile. He discovered a way to create a sculpture that was in constant movement and therefore always changing, making it a dynamic and exciting art form.

A mobile is a type of sculpture that is made up of carefully balanced parts that move. They move, are kinetic, because they respond to the energy in air currents. When your mobiles are completed you will be able to watch them shift from one form to another.

In class we also discussed and compared how Calder and Joan Miró's work share some similarities. You made comments about the geometric shapes found in Cat Encircled by The Flight of a Bird and how even though Miró's work is a painting it has a lot of movement in it. It looks like it could be one of Calder's mobiles in painting form.

Cat Encircled by the Flight of a Bird, 1941, Joan Miró

Sunday, February 1, 2009

Announcements Week 20 (02-08 Feb. 2009)

It is the beginning of 2nd Semester and this is what your week looks like:

Grade 6
All new projects are starting in each of the Grade 6 classes:

  • 601 - String Art, please bring a needle to class
  • 602 - Mobiles inspired by Calder
  • 603 - Still deciding on this one, I'll get back to you soon.

Grade 7
Each section of the Grade 7 is working on a different project:
  • 701 - Space Collage, should be able to finish this Friday
  • 702 - Friendship Circle, all photos should be in and you will be starting your Collage Portrait
  • 703 - Sumerian Inspired Cuneiform

Grade 8
This week you will complete and deliver a finalized Periodic Table (oh yes, that SAME one from last year!)

Wednesday, January 28, 2009

Collage 701 - Deep Sea


701's Underwater Collage is finished and looks amazing.

Monday, January 26, 2009

String Art 1


Last week I introduced 601 to String Art. You have just started exploring the very basics, so while you do that check out some of these links. They will give you ideas...

Sunday, January 25, 2009

Announcements Week 19 (26 Jan.-01 Feb. 2009)

Grade 6
This is the last, last week for Fingerpints.

Grade 7
You will be making sure that your Development Sketchbooks are in complete order and that all art work done so far is mounted.

Grade 8
The Cells Project is finished
. This week you will be completing a self assessment of your painting. The Rubric can be found in Grade 8 Rubrics under the title Cells 6.

Tuesday, January 20, 2009

Friendship Wheel - 702

As you know, a new task has been set for us due to the Ministry coming for a visit next month. Your challenge is to create a piece as large as the Ceiling Fresco that is somewhat portable and able to be used as a stand-alone piece of work.

After a great brainstorming session you decided upon a Friendship wheel alà Facebook. What you have to decided this week is exactly what the wheel is going to look like and set up parameters for what the connecting lines will signify...

Collage - 701

A pochoir print of Matisse’s “Polynesia”

Inspired by the need to create something positive in our class, you are now working on two large Collage pieces for the bulletin boards outside the Art Room. In your last lesson I set you a challenge to create a Collage of cut-paper shapes inspired by the work of Henri Matisse in the length of one period, which you did. Your first collage is based on the themes of the Sea, Underwater, Creatures. This week you will continue to mount the Underwater Collage and then move onto deciding a theme for the second board working under the same tight time constraints. Good Luck!

Pigeon Portraits - 703


After making your Paper Pigeons the class shifted gears and started on another tangent of Pigeon Art: Pigeon Portraits in water colour. Each one of you has been working on and completing portraits inspired by your original Paper Pigeons. This week you will be making sure that your Portraits are complete and in class discussing how to display all of the paintings as one large piece. You will also be recording your progress in your Development Sketchbooks.

Sunday, January 18, 2009

Announcements Week 18 (19-25 Jan. 2009)

Continuing with what we were doing last week:

Grade 6 Fingerprint Paintings and Loose Ends
You will be completing your Fingerprint Paintings and wrapping up any loose ends in your Development Sketchbooks.

Grade 7 Development Sketchbooks, Mounted Work & New Projects
Making sure that your Development Sketchbooks are in complete order and that all art work done so far is mounted, as well as:

  • 701 - Complete the Bulletin Board Collages
  • 702 - Plan the Friendship Circle
  • 703 - Complete and Mount Pigeon Portraits

Grade 8 Cell Paintings
Deadline dates are passed. This week you will be writing an in-depth reflection of the Cells Project. See the Cells 5 posting.

Saturday, January 17, 2009

Kapadokya Projects 3 - 702

As you know - we have completed our Ceiling Painting (I am still waiting for photos to be emailed to me). This project has gone extremely well despite numerous interruptions in our schedule. What I am posting for you today is reminder of the reflections you have been doing in your Development Sketchbooks.

You should have the following documented:

Ceiling Fresco 4

  1. Explain what went wrong in the last lesson
  2. Write down the solutions you came up with for those problems:
  • One Person mixes the Paint
  • People are lined up 3 to a table in order of the Grid
  • Tape the side of the tile with Name + Tile #
  • Each Student will have a reference photo to work from.

Ceiling Fresco 5
  1. Describe everybody’s role in the project, eg. Murat in charge of the grid, Ege in charge of the reference photos, clean up and also working in the smaller groups at each table of 3 tiles.
  2. Progress. Describe how we put the fresco together on the floor and made some artistic decisions about colour, unity and texture.

Ceiling Fresco 6

  1. The completed project, describe what it looks like and how we put it up.
  2. Reflect on your thoughts about this project.